A question that keeps coming up:
How can I have my own tools + some of the pyrevit tools under one toolbar?
This is a WIP, feel free to comment and I will add the meaningful comments to the guide to consolidate it
Assumption is that you don’t have pyrevit or its CLI installed
Install pyRevit without its toolbar
-
Install the pyrevit CLI: this can be done with the CLI installer or through a command line script or using chocolatey
-
Start the command line: type
cmdin the windows search box and press enter -
Run the following command:
pyrevit clone NameOfYourClone core --dest="C:\\path where you want to save your clone of pyrevit"- core is the deployment name, it does not contain any of the tools of the pyRevit regular UI, so no
extensionsfolder - add
--branch=developif you want the WIP version of the codebase
 More info about it here: pyRevit Deployments
 - core is the deployment name, it does not contain any of the tools of the pyRevit regular UI, so no
-
Attach your clone to Revit:
pyrevit attach NameOfYourClone default --installed --allusers
You now have pyRevit installed but without any of its UI tools
Create your own toolbar Extension
Let’s be extremly lazy and create a few tool with https://builder.pyrevitlabs.io/
- go to https://builder.pyrevitlabs.io/
- create a few buttons without worrying about the code and then download the extension
- unzip in a proper location
- in the command line, add the extension path to the config file:
- pyrevit extensions paths add “C:\PathToYourExtensions”
Now you can start Revit and your extension tab should appear
Alternative way to create your extension manually:
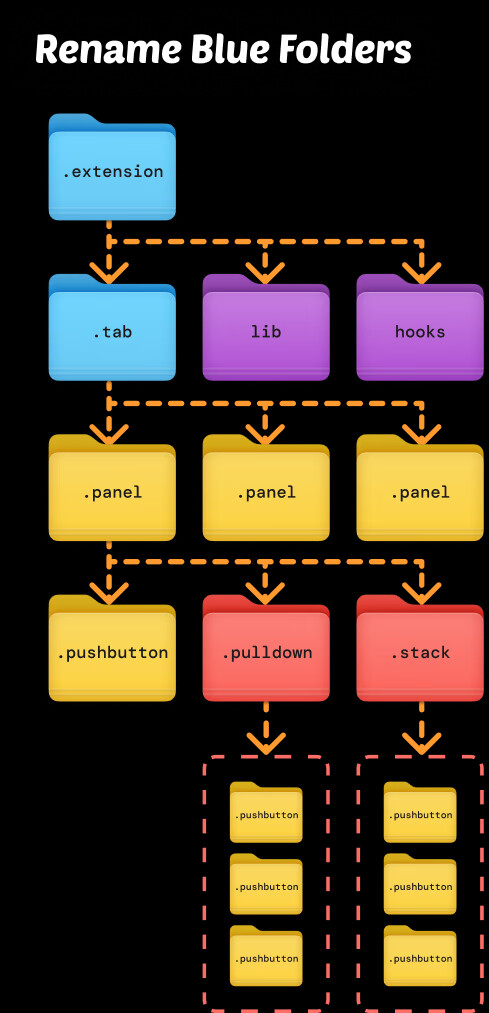
- Create a series of folders following this structure pattern
The names of the folder needs to be suffixed as follow:
Courtesy of @ErikFrits
or
- Download the this folder and remix its content anyway you want respecting the tree logic shown above
- then apply steps 4 and 5
Plenty of other ways and ressources: